How to Wear Your Fascinator Comfortably and Securely
|

|
|
TIPS ON WEARING FASCINATORS, HATINATORS, COCKTAIL HATS, and HATS....
Do you want to know the secrets to making the fascinator stay comfortably on your head for hours or even all day long? Read on:
There ARE some tools and secrets used in millinery and by hairdressers that I am happy to share with you. Also, if you plan to visit your hairdresser prior to your hat event (day at the races, wedding, etc....) bring your headpiece along! They can show you how to wear it, and how it will work with your hairstyle to not only look best, but also to help it stay put all day.
Traditionally fascinators are worn on the right side of the head: usually designed to sit cocked at an attractive angle and forward partially across the brow, but there is no steadfast rule about this. Although the majority of fascinators are meant to be worn in the traditional way, some styles can be worn to the left, or even the center. Some are even made specifically to look great at any angle or placement, giving the wearer plenty of flexibility to choose. The best plan is to try the piece on and decide which is the most flattering and comfortable look for you. Try adding some interest by positioning your fascinator to frame your face, then tilt dramatically across the hair line. Also, as a reminder ~ wind and rain do not mix well with delicate headwear so please stay under cover during inclement weather while wearing your special hat.
There are some differences in headpiece construction that may dictate how each piece is worn:
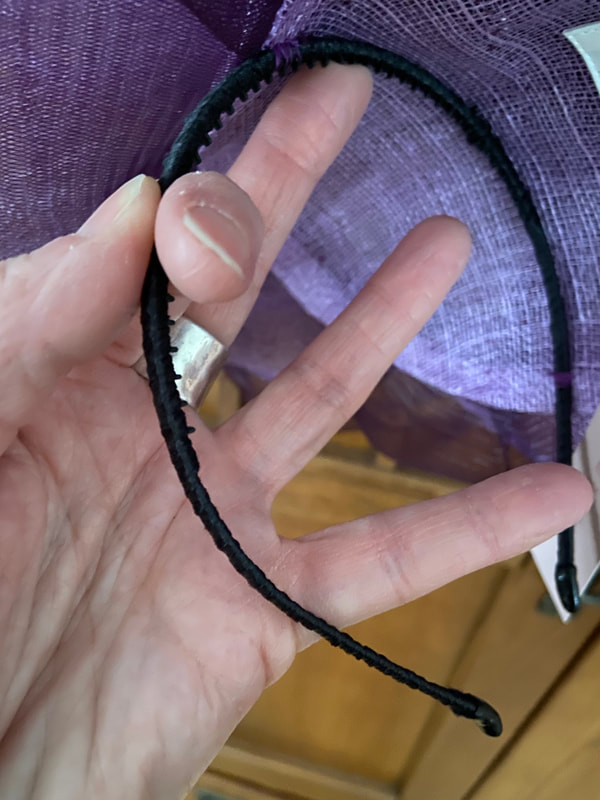
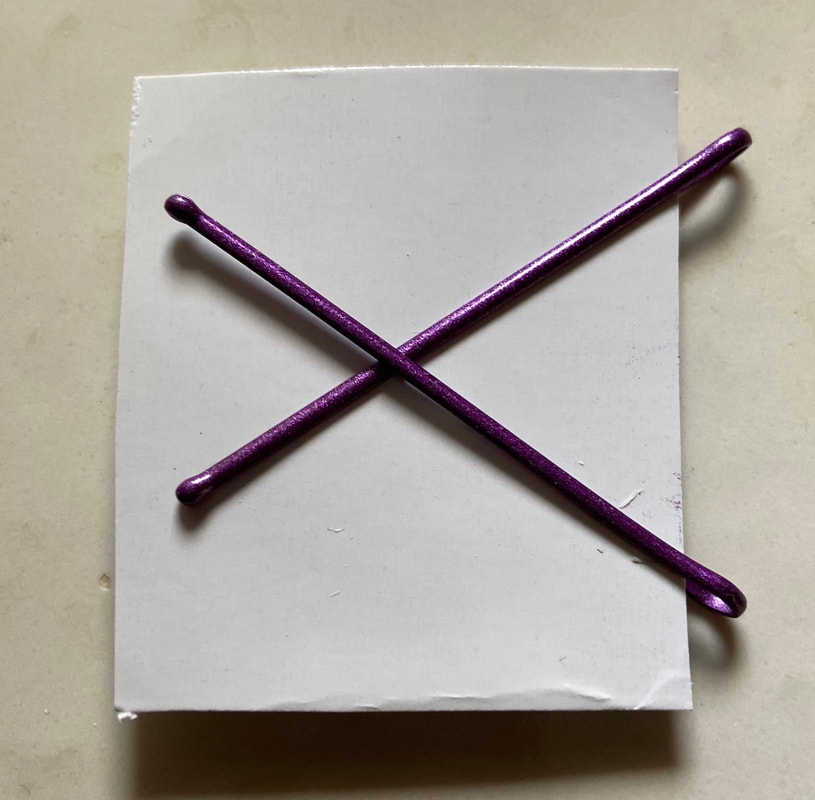
Many of the headpieces that I make are situated on a HEADBAND. The headbands I use are purposefully quite thin so they do not pinch or cause headaches. When wrapping them with the matching satin, I weave in tiny soft silicone teeth and tips for added stability. A fascinator or hatinator on a headband is easy to wear and super easy to place. Even so, I often recommend the use of bobby pins for additional security, especially with some my the larger designs. You can match the pins to the hat or your hair color, and it can be helpful to spritz each bobby pin with hairspray prior to sliding into the hair. Cross the pins in an X shape for extra support, and place with the wavy side down to hold the hair in place. You can even tease the hair just a bit for extra extra security, but that's not usually necessary. Sometimes just clipping a few strands around the outside of the headband makes a world of difference to help hold everything in place. I often include coordinated bobby pins with my larger fascinators.
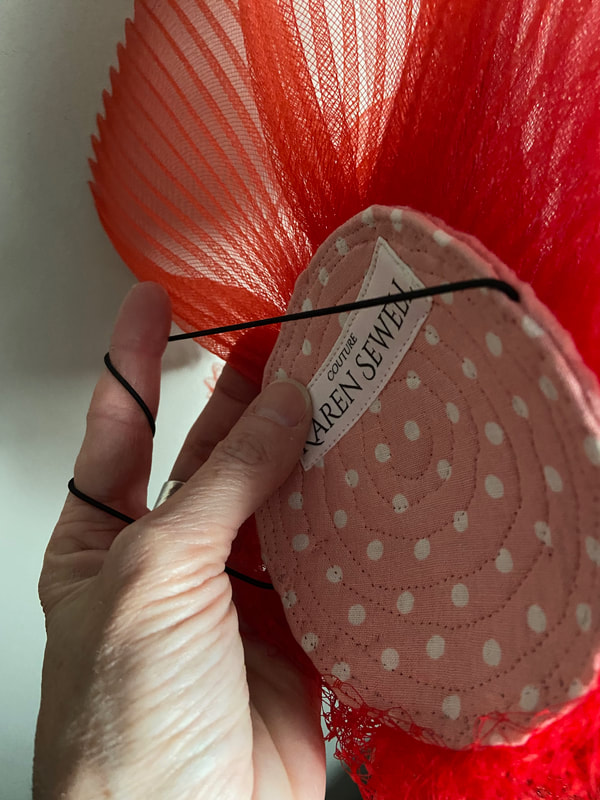
I sometimes prefer to use MILLINERY ELASTIC to secure some of the smaller designs, as this allows for more flexibility of placement. Millinery elastic can be virtually invisible for a very clean (“how does that stay up there?”) appearance. There is no real right or wrong in positioning, so try out a few different angles and go with the look you prefer..... the most flattering and comfortable look for you. The elastic always goes behind your ears, around head and discreetly under the hair. (Although my model doesn't really have ears, the photo above should give the general idea) If your fascinator is secured with millinery elastic it is possible the elastic won’t be strong enough to be used alone, especially for a long day or evening of wear. Once again a couple of bobby pins will provide plenty of additional stability.
Sometimes I will add a small COMB or CLIP to a fascinator as a secondary means of attachment for a piece on a headband or with millinery elastic. Fascinators that fasten with a comb should be attached so the comb’s teeth point towards the face. And as always, it’s fine to add a couple of bobby pins or even a hatpin if you like.
HAT PINS are longer than bobby pins, and are placed by sort of weaving them down through the hat material into a few strands of hair, and back up through the hat again. Some headpieces have netting sewn underneath for this purpose. There are some lovely vintage hatpins in shops that will compliment and dress up most any look.
Do you want to know the secrets to making the fascinator stay comfortably on your head for hours or even all day long? Read on:
There ARE some tools and secrets used in millinery and by hairdressers that I am happy to share with you. Also, if you plan to visit your hairdresser prior to your hat event (day at the races, wedding, etc....) bring your headpiece along! They can show you how to wear it, and how it will work with your hairstyle to not only look best, but also to help it stay put all day.
Traditionally fascinators are worn on the right side of the head: usually designed to sit cocked at an attractive angle and forward partially across the brow, but there is no steadfast rule about this. Although the majority of fascinators are meant to be worn in the traditional way, some styles can be worn to the left, or even the center. Some are even made specifically to look great at any angle or placement, giving the wearer plenty of flexibility to choose. The best plan is to try the piece on and decide which is the most flattering and comfortable look for you. Try adding some interest by positioning your fascinator to frame your face, then tilt dramatically across the hair line. Also, as a reminder ~ wind and rain do not mix well with delicate headwear so please stay under cover during inclement weather while wearing your special hat.
There are some differences in headpiece construction that may dictate how each piece is worn:
Many of the headpieces that I make are situated on a HEADBAND. The headbands I use are purposefully quite thin so they do not pinch or cause headaches. When wrapping them with the matching satin, I weave in tiny soft silicone teeth and tips for added stability. A fascinator or hatinator on a headband is easy to wear and super easy to place. Even so, I often recommend the use of bobby pins for additional security, especially with some my the larger designs. You can match the pins to the hat or your hair color, and it can be helpful to spritz each bobby pin with hairspray prior to sliding into the hair. Cross the pins in an X shape for extra support, and place with the wavy side down to hold the hair in place. You can even tease the hair just a bit for extra extra security, but that's not usually necessary. Sometimes just clipping a few strands around the outside of the headband makes a world of difference to help hold everything in place. I often include coordinated bobby pins with my larger fascinators.
I sometimes prefer to use MILLINERY ELASTIC to secure some of the smaller designs, as this allows for more flexibility of placement. Millinery elastic can be virtually invisible for a very clean (“how does that stay up there?”) appearance. There is no real right or wrong in positioning, so try out a few different angles and go with the look you prefer..... the most flattering and comfortable look for you. The elastic always goes behind your ears, around head and discreetly under the hair. (Although my model doesn't really have ears, the photo above should give the general idea) If your fascinator is secured with millinery elastic it is possible the elastic won’t be strong enough to be used alone, especially for a long day or evening of wear. Once again a couple of bobby pins will provide plenty of additional stability.
Sometimes I will add a small COMB or CLIP to a fascinator as a secondary means of attachment for a piece on a headband or with millinery elastic. Fascinators that fasten with a comb should be attached so the comb’s teeth point towards the face. And as always, it’s fine to add a couple of bobby pins or even a hatpin if you like.
HAT PINS are longer than bobby pins, and are placed by sort of weaving them down through the hat material into a few strands of hair, and back up through the hat again. Some headpieces have netting sewn underneath for this purpose. There are some lovely vintage hatpins in shops that will compliment and dress up most any look.
|
|
|
|